Keywords
Authorizations, license
-
Visible by: Everyone -
All rights reserved
-
151 visits
Double Header


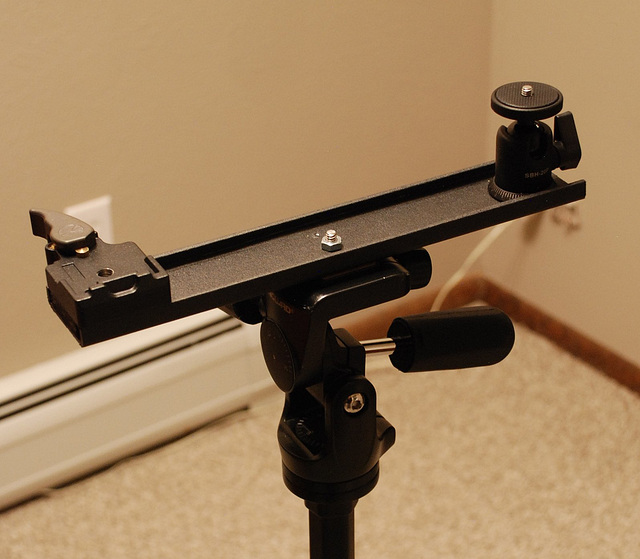
Another tripod hack, this time a crossbar for mounting two camcorders for filming Monday's Space Shuttle launch (STS-131).
The plan is to mount one camcorder with a telephoto extension on the fixed quick-release (left) and adjust the entire assembly to align that camera at maximum zoom looking at LC-39A to get the ignition and early liftoff. The second mount, a small Promaster ball head, is for a second camcorder, with a somewhat wider field of view, independently pointed at the same pad with slightly higher inclination, to capture ignition, liftoff, and the first minute or so of the launch.
Dunno if it'll work, but there's no harm trying. All told, there's about $40 worth of materials involved, $28 of which was the ball head which I had to buy for the project (already had the QR plate and shoes and other bits and pieces).
The crossbar is a piece of 2" x 3/8" steel C-channel from Home Depot, cut to 12" long, drilled for 1/4" bolts, and covered with black gaffer tape (in lieu of black paint, which I don't have the time to do right now). Oddly enough, the gaffer tape makes it look pretty professional, as if it's powder-coated.
1/4"-20 bolts hold the two mounts on at either end. In the center is the spare 3/8" shoe that came with my Vanguard Tracker 4 tripod, with the screw removed and replaced by another 1/4"-20 bolt and nut (need to get some washers tomorrow morning). And yes, I did drill a 5/16" hole in the bar to receive the set screw on the shoe, because I am that detail-oriented.
The Manfrotto QR plate on the left was the same width as the C-channel, which posed a small problem - it wanted to ride on the tines of the C. To fill the gap, without having to fuss about finding something exactly the right thickness, I took two leftover composite door-hanging shims, cut 2" long pieces from them where their thicknesses added up right, and then drilled an oversized hole in the middle. I then oversized the hole lengthwise to the crossbar, so that when I assembled everything and snugged up the bolt, the wedge-like shims would slip just a little bit until they were exactly the right height inside the C-channel.
Brilliant, if I do say so myself...
- Keyboard shortcuts:
Jump to top
RSS feed- Latest comments - Subscribe to the comment feeds of this photo
- ipernity © 2007-2024
- Help & Contact
|
Club news
|
About ipernity
|
History |
ipernity Club & Prices |
Guide of good conduct
Donate | Group guidelines | Privacy policy | Terms of use | Statutes | In memoria -
Facebook
Twitter

Sign-in to write a comment.